表单功能是一个使用频率非常高的功能,wordpress有著名的contact form插件来解决表单问题,那么phpcms是如何解决的呢?
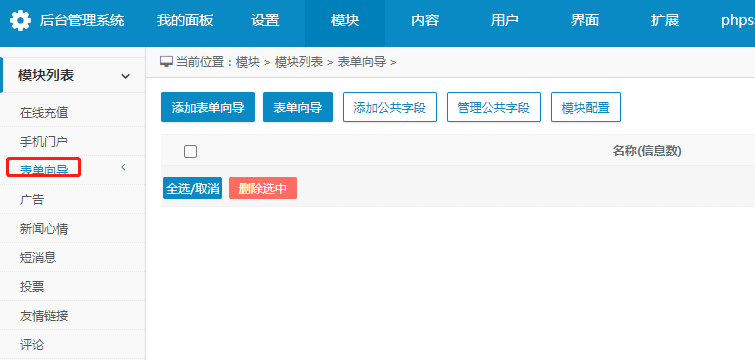
phpcms系统有官方提供的表单向导插件,这个插件简单但是功能非常强大,通过后台可以非常方便的添加各种自定义字段来满足要求,这样能非常快捷的指定各种功能的表单:
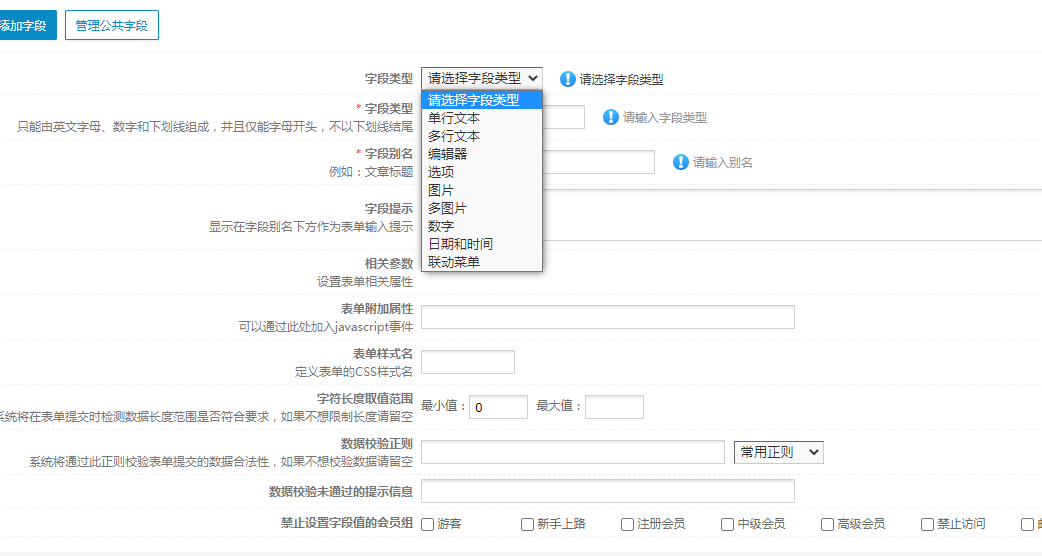
但是官方生成的表单模版是非常简单的,那我们应该如何修改呢?
步骤1:创建表单向导
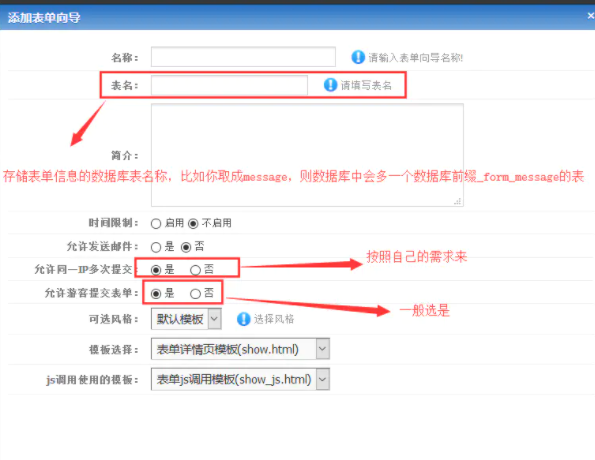
(3):接下来就是我的show_message.html文件编写过程了,该文件的编写需要参考原先show.html写法,我们来看下show.html里面关于表单的部分是怎么写的。
<form method="post" action="?m=formguide&c=index&a=show&formid={$formid}&siteid=<?php echo $this->siteid;?>" name="myform" id="myform">
<table class="table_form" width="100%" cellspacing="0">
<tbody>
{loop $forminfos_data $field $info}
{if $info['formtype']=='omnipotent'}
{loop $forminfos_data $_fm $_fm_value}
{if $_fm_value['iscomnipotent']}
{php $info['form'] = str_replace('{'.$_fm.'}',$_fm_value['form'],$info['form']);}
{/if}
{/loop}
{/if}
<tr>
<th width="80">{if $info['star']} <font color="red">*</font>{/if} {$info['name']}
</th>
<td>{$info['form']} {$info['tips']}</td>
</tr>
{/loop}
</tbody>
</table>
<input type="submit" name="dosubmit" id="dosubmit" value=" 提交 "> <input type="reset" value=" 取消 ">
</form>
(1):form的action部分,该部分的值为?m=formguide&c=index&a=show&formid={$formid}&siteid=<?php echo $this->siteid;?>,一般情况下你直接复制到自己的form表单的action部分就可以。
(2):至于form标签下的name=”myform” id=”myform”部分,是可有可无的,想写就写不想写去掉也可以的。
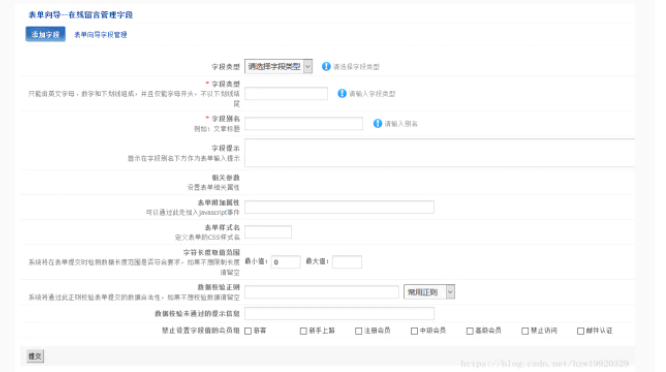
(3):接下来是{loop $forminfos_data $field $info}循环体了,这个循环体比较重要,$field拿到的是你在创建完表单向导之后,添加字段的时候取的字段英文名,对应的就是存储你留言信息数据库中的字段,而$info则存储着你定义数据表字段的一些额外信息,比如数据表字段的中文名,具体这些值在哪些地方设置呢?就是在你创建完表单之后,点击添加字段之后出现的界面中填写的内容,具体就是下面界面:

到此为止,我们查看了phpcms系统默认的show.html表单样式实现,接下来我们实现自己的表单样式,我直接把我的实现代码贴出来
<form method='post' class="met-form met-form-validation" enctype="multipart/form-data" action='{APP_PATH}index.php?m=formguide&c=index&a=show&formid={$formid}&action=js&siteid=<?php echo $this->siteid;?>'>
     {loop $forminfos_data $field $info}
     {php var_dump($info)}
     {if $info['formtype']=='text'}
     <div class='form-group'>
        <input name='info[{$field}]' class='form-control' type='text' placeholder='{$info[tips]}' />
     </div>
     {/if}
     {if $info['formtype']=='textarea'}
     <div class='form-group'>
        <textarea name='info[{$field}]' class='form-control'  placeholder='{$info[tips]} ' rows='10'></textarea>
     </div>
     {/if}
     {/loop}
     <div class="form-group m-b-0">
     <button type="submit" name="dosubmit" id="dosubmit" class="btn btn-primary btn-lg btn-block btn-squared" value=" 提交 ">提交留言</button>
     </div>
</form>
我这段代码对原先show.html最大的改动在于下面几点
- 首先我自己的表单样式为class=”met-form met-form-validation”,而原先的代码中不存在这部分内容
- 我去除了name=”myform” id=”myform”这部分内容值
- 接下来在表单创建input部分,同样使用了
{loop $forminfos_data $field $info}的方式,并且通过$info[‘formtype’]来判断是单行文本还是多行文本- 以单行文本为例
<input name=’info[{$field}]’ class=’form-control’ type=’text’ placeholder='{$info[tips]}’ />,这部分中name=’info[{$field}]’比较关键,如果你的表单中没写这几句代码,你会发现在提交表单之后,数据库中根本没有你填写的内容信息,后台中留言信息列表中也不会出现你写的留言内容- 最后在submit部分添加了name=”dosubmit”这句代码,注意,如果没有这句代码,你照样在数据库中找不到你的留言内容。
至此为止,我们其实已经可以创建自己风格的表单啦,那么有个疑问,show.html中的$forminfos_data的数据是哪里来的呢?我们能否自己给$forminfos_data赋值呢?答案是可以的。
既然要自己给$forminfos_data赋值,那么我们肯定得需要知道$forminfos_data值与哪些数据库表有关呢?
我们首先分析下与表单向导有关的phpcms目录,phpcms\templates\default\formguide目录用于前台页面的编写,phpcms\modules\formguide\templates用于后台页面的编写,也就是你在后台点击添加字段之类的按钮,弹出来的弹窗html文件都是在phpcms\modules\formguide\templates这个目录下实现的,phpcms\modules\formguide下的index.php用于处理前台表单页面提交表单之后的信息处理,phpcms\modules\formguide下的formguide.php用于处理后台报表单页面提交表单之后的信息处理,很显然,$forminfos_data的值应该是在index.php中赋的,我们查看index.php文件的构造函数:
function __construct() {
    $this->db = pc_base::load_model('sitemodel_model');
    $this->m_db = pc_base::load_model('sitemodel_field_model');
    $this->M = new_html_special_chars(getcache('formguide', 'commons'));
    $this->siteid = intval($_GET[siteid]) ? intval($_GET[siteid]) : get_siteid();
    $this->M = $this->M[$this->siteid];
}
<div class="modal-body">
     {php $online_recruit_formid=14}
     {php $online_recruit_siteid=1}
     <form method='POST' class="met-form met-form-validation" enctype="multipart/form-data" action='{APP_PATH}index.php?m=formguide&c=index&a=show&formid={$online_recruit_formid}&action=js&siteid={$online_recruit_siteid}'>
     {pc:get sql="select * from sw_model_field where modelid=$online_recruit_formid" return="data_one"}
     {loop $data_one $r_one}
     <!--{php var_dump($r_one)}-->
        {if $r_one['formtype']=='text'}
        <div class='form-group'>
        <input name='info[{$r_one[field]}]' class='form-control' type='text' placeholder='{$r_one[tips]}' />
        </div>
        {/if}

        {if $r_one['formtype']=='textarea'}
        <div class='form-group'>
        <textarea name='info[{$r_one[field]}]' class='form-control'  placeholder='{$r_one[tips]} ' rows='8'></textarea>
        </div>
        {/if}

        {if $r_one['formtype']=='box'}
        {php $select_area=$r_one[setting]}
        <div class='form-group'>
           <label class='control-label'>{$r_one[tips]}</label>
           <div class="radio-custom radio-primary">
                <input name='info[{$r_one[field]}]' type="radio" checked value='男' id="para12_1">
                <label for="para12_1">男</label>
           </div>
           <div class="radio-custom radio-primary">
                <input name='info[{$r_one[field]}]' type="radio" value='女' id="para12_2">
                <label for="para12_2">女</label>
           </div>
       </div>
      {/if}
    {/loop}
    {/pc}

    <div class="form-group m-b-0">
         <button type="submit" class="btn btn-primary btn-squared" name="dosubmit">保存</button>
         <button type="button" class="btn btn-default btn-squared m-l-5" data-dismiss="modal">取消</button>
    </div>
 </form>
</div>
(1):上面代码中的{php $online_recruit_formid=14}中的14是我们在后台当前创建的表单向导id,这个id值可以到数据库前缀_model表中找到,也可以直接通过后台点击模块—>表单向导—>找到我们的表单,点击访问前台,从ur中找到对应的formid。
(2):上面代码的<input name=’info[{$r_one[field]}]’ class=’form-control’ type=’text’ placeholder='{$r_one[tips]}’ />中info[{$r_one[field]}]中的info这个标志千万不能不写,我就因为没写后台怎么都收不到提交的表单内容,你如果不写的话,就会发现怎么保存都不会存储数据到数据库中。
下面是我在写在线留言的过程中遇到的一些坑,在此做个总结
(1):单选框字段设置好之后,在前台页面中选择之后,后台数据库中一直插入不进去数据,原因在于我在设置单选框字段值的时候出现了问题,具体应该按照下图设置:
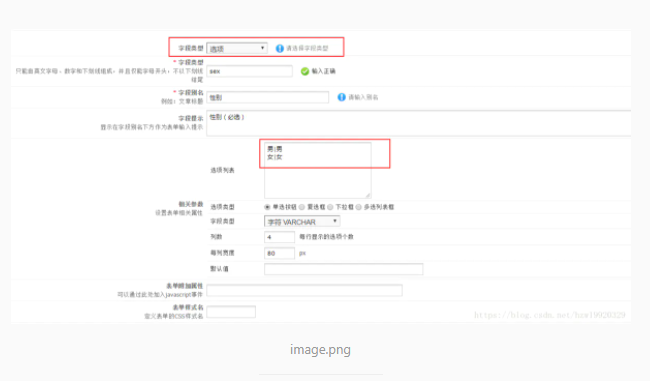
尤其要注意选项列表里面的内容。
(2):如果自己实在不知道该怎么写前台表单的时候,可以查看后台点击模块—>表单向导—>找到我们的表单,点击访问前台,右键查看源代码,仿照phpcms的模板编写。


评论0